Hey MFK, been a while! After selling all of my fish and aquariums, I've had the funds and time to shift focus to something more apartment friendly. I've always been a herper alongside an aquarist and decided to go full beast mode on my paludarium since it's the only enclosure I'll be keeping for the next few years. I originally had my pair of water dragons and male basilisk inside of a 240 gallon 3/4" thick glass aquarium but there was no way in hell I was going to hold on to that thing with how mobile I'll be. My goal was to keep a relatively larger sized enclosure that would be simple to move by myself whether it'd be up stairs or down a narrow hallway. After a bit of browsing around and pricing out different options, I decided to go with building a collapsible housing that would wrap around a Zoo-Med 50 gallon LowBoy frag tank. This way I could move up the tank and individual panels into any room and then just assemble it back together once it's in a final location. I built the surround out of the lightest parts possible without compromising the integrity of the structure. The materials I used were 2x1 framing lumber and 1/4" plywood/acrylic.
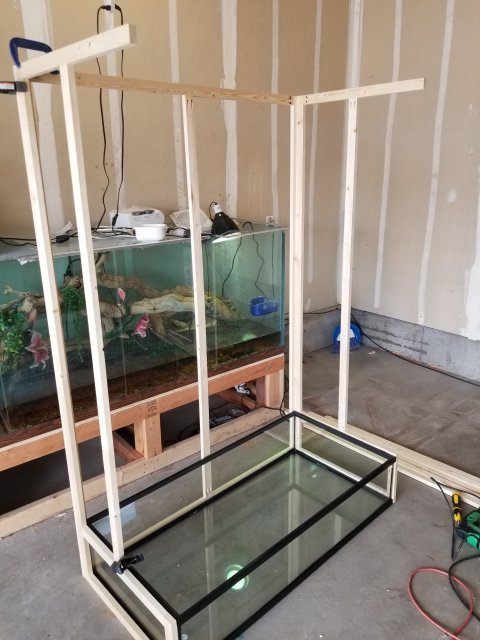
Here's the skeleton with the back panel and two side panels bolted into the back.
The housing simply wraps around the aquarium underneath keeping the waterproof
bottom process stupidly easy with a clean look. However, if I were to do this again I
would have the walls protrude into the interior of the aquarium's footprint so that any
run off would fall directly into the tank without the need for a "rain catch" lip around
the entire base of the enclosure.
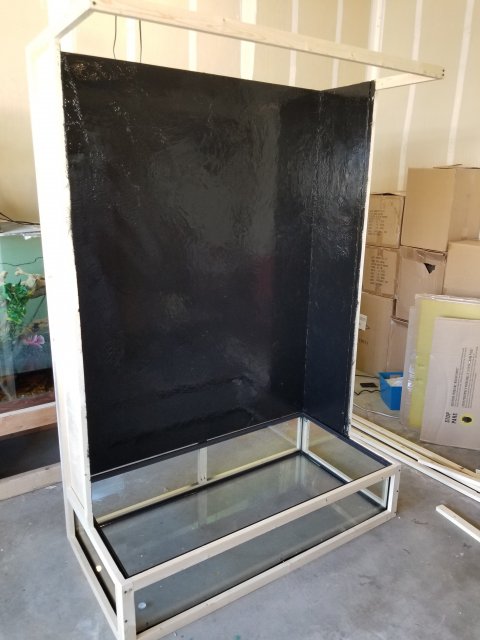
Here is the enclosure with the front frame connected. The plywood was installed on
the back and side panels and then coated with black "flex seal" liquid. I don't have a
seal formed between the back corners due to the need of disassembly. Fortunately, it
doesn't need that 100% waterproof factor for my intended purpose to simply run water
off of any degradable surfaces into the aquarium. Another plus is that the background
will be covering the back corners anyways so this back coat was more of an insurance
if anything got behind there.
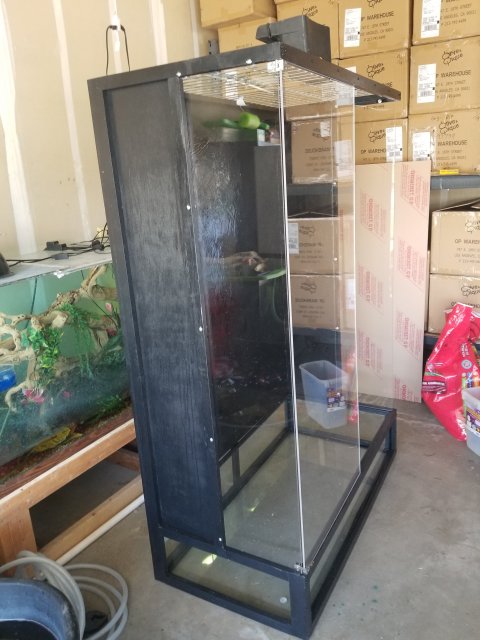
Here is the enclosure with a flat black paint job and the acrylic windows/doors installed. I added a 3rd hinge in the center to help support the rigidity of the door later on. I also added magnetic door catches on the top and bottom frames to hold the doors shut. Also up on the top, I installed the metal wire top. I was imagining how the pond weir would sit in the canopy and cut parts of the top to remove any pieces that would disturb the waterfall and potentially splash above the frame.
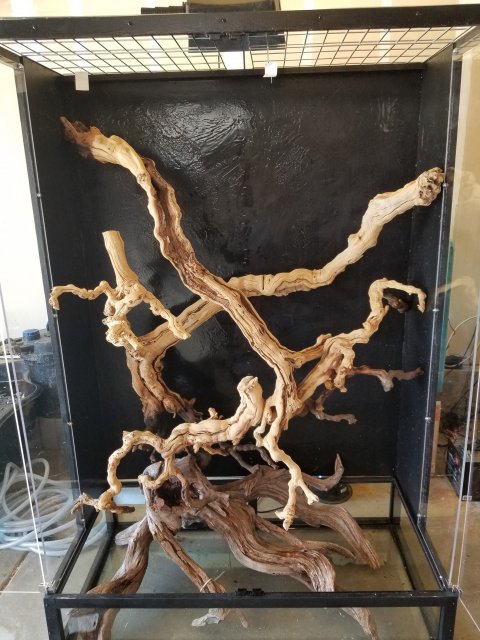
Here is a picture of me envisioning the hardscape and how I wanted the 3D background to flow with the shape. I eventually decided to go with a central waterfall design to make the spacing up top for lighting a lot easier to work with around the pond weir.
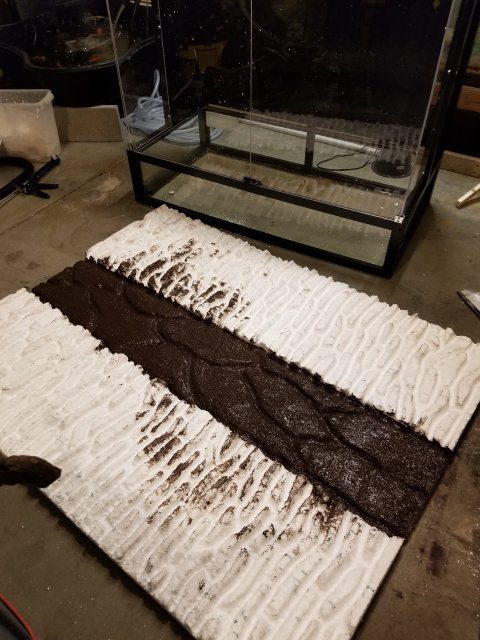
Here is an image of the background after coating the waterfall section in brown silicone. I tried something new this time around with this background compared to the ones I've made in the past. I wanted to keep it simple while also non-obtrusive with many ledges for the reptiles to climb up. I also decided to try out the silicone only coating method for the sides and added substrate/sphagnum moss to the silicone while it was curing. Normally I use hot tub grade tile grout and pond armor but fortunately this won't be fully submerged in the water. Plus, since this background will still be softer, I can push in any plants/decor and silicone it in place. I also added a pond liner lip on the back and sides to catch any run off that gets behind the background into the tank.
Now for some photos of the paludarium fully assembled and decorated
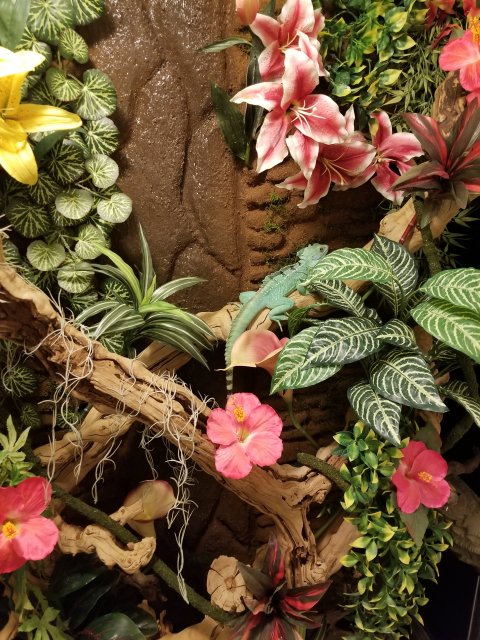
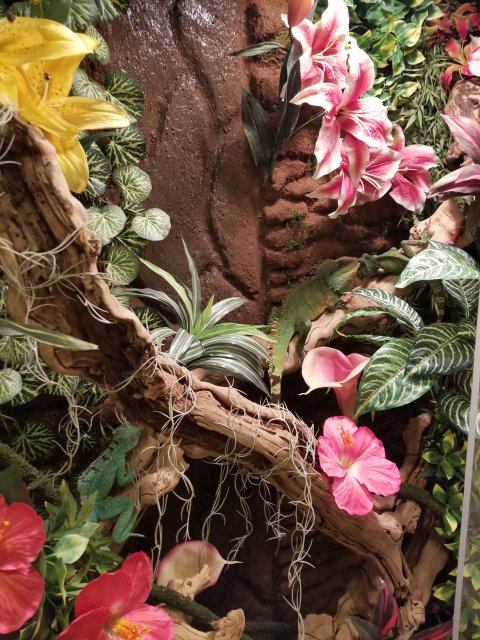
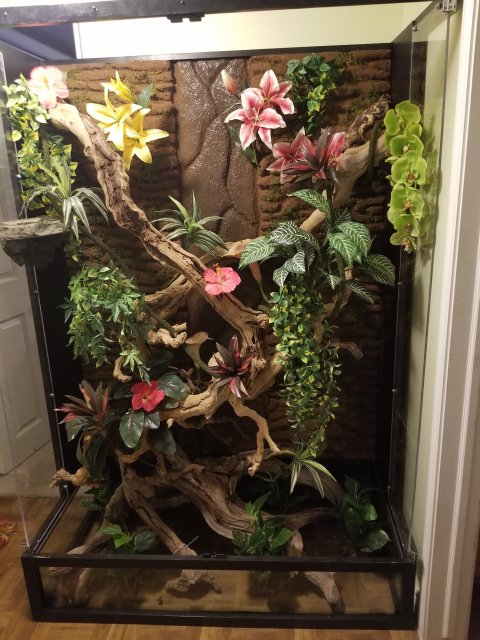
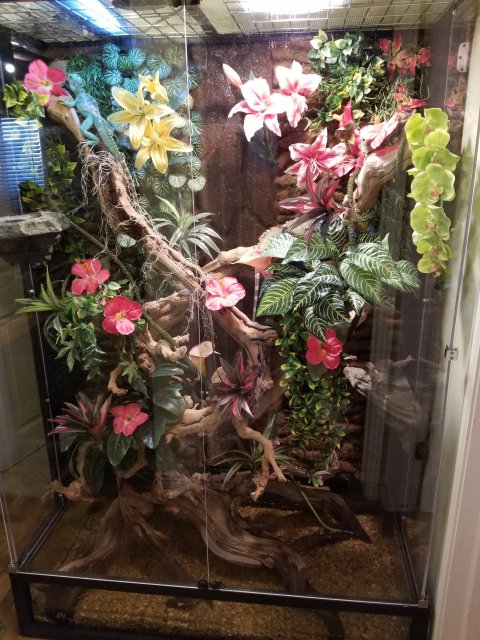
I'm slowly still adding in plants and have since scaped out the water basin a bit more with artificial anubias and some rockwork. I have a video of the enclosure with the waterfall running on my Instagram: (if linking is not allowed then just let me know and I'll remove it). I have a pump in the reservoir that feeds into the weir up top whenever the humidity drops below acceptable levels. As was stated earlier, I had to add a lip around the entire bottom of the surround with flex tape so that the splashed water would run off into the aquarium and not my floor haha. Dumb thing but it never crossed my mind until after it was built. The total size is 6' tall x 4' long x 2' wide. I have heat and humidity controlled via hygrotherm with my heat emitters and waterfall. I also have full spectrum lighting installed on timers so I never have to touch anything. All plants aside from sphagnum moss are artificial to further increase the ease of maintenance. I'm waiting on some fancy lizard handles I purchased from India to arrive, but other than that I've done everything I originally wanted with it. The total cost came out to around $650 with probably 20ish hours of labor. If I ever make another, I'm going to try out 80/20 aluminum extrusion for more strength and ease of disassembly. Let me know what you guys think!

Here's the skeleton with the back panel and two side panels bolted into the back.
The housing simply wraps around the aquarium underneath keeping the waterproof
bottom process stupidly easy with a clean look. However, if I were to do this again I
would have the walls protrude into the interior of the aquarium's footprint so that any
run off would fall directly into the tank without the need for a "rain catch" lip around
the entire base of the enclosure.

Here is the enclosure with the front frame connected. The plywood was installed on
the back and side panels and then coated with black "flex seal" liquid. I don't have a
seal formed between the back corners due to the need of disassembly. Fortunately, it
doesn't need that 100% waterproof factor for my intended purpose to simply run water
off of any degradable surfaces into the aquarium. Another plus is that the background
will be covering the back corners anyways so this back coat was more of an insurance
if anything got behind there.

Here is the enclosure with a flat black paint job and the acrylic windows/doors installed. I added a 3rd hinge in the center to help support the rigidity of the door later on. I also added magnetic door catches on the top and bottom frames to hold the doors shut. Also up on the top, I installed the metal wire top. I was imagining how the pond weir would sit in the canopy and cut parts of the top to remove any pieces that would disturb the waterfall and potentially splash above the frame.

Here is a picture of me envisioning the hardscape and how I wanted the 3D background to flow with the shape. I eventually decided to go with a central waterfall design to make the spacing up top for lighting a lot easier to work with around the pond weir.

Here is an image of the background after coating the waterfall section in brown silicone. I tried something new this time around with this background compared to the ones I've made in the past. I wanted to keep it simple while also non-obtrusive with many ledges for the reptiles to climb up. I also decided to try out the silicone only coating method for the sides and added substrate/sphagnum moss to the silicone while it was curing. Normally I use hot tub grade tile grout and pond armor but fortunately this won't be fully submerged in the water. Plus, since this background will still be softer, I can push in any plants/decor and silicone it in place. I also added a pond liner lip on the back and sides to catch any run off that gets behind the background into the tank.
Now for some photos of the paludarium fully assembled and decorated


I'm slowly still adding in plants and have since scaped out the water basin a bit more with artificial anubias and some rockwork. I have a video of the enclosure with the waterfall running on my Instagram: (if linking is not allowed then just let me know and I'll remove it). I have a pump in the reservoir that feeds into the weir up top whenever the humidity drops below acceptable levels. As was stated earlier, I had to add a lip around the entire bottom of the surround with flex tape so that the splashed water would run off into the aquarium and not my floor haha. Dumb thing but it never crossed my mind until after it was built. The total size is 6' tall x 4' long x 2' wide. I have heat and humidity controlled via hygrotherm with my heat emitters and waterfall. I also have full spectrum lighting installed on timers so I never have to touch anything. All plants aside from sphagnum moss are artificial to further increase the ease of maintenance. I'm waiting on some fancy lizard handles I purchased from India to arrive, but other than that I've done everything I originally wanted with it. The total cost came out to around $650 with probably 20ish hours of labor. If I ever make another, I'm going to try out 80/20 aluminum extrusion for more strength and ease of disassembly. Let me know what you guys think!


