Help me reseal this tank please
- Thread starter FahakaHome
- Start date
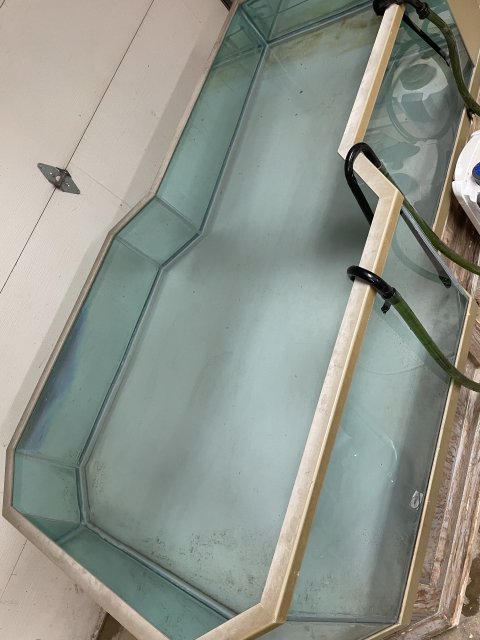
I have only dealt with seams more than 90 degrees on old hexagonal tanks. I scraped and cleaned the insides, leaving the old silicone in-between and outside the panels. Then laid fresh heavy beads inside. It worked fine.
its your setup. but i would tear it down completely and rebuild. some people get away with just doing the secondary seal (inside bead) but on a tank that large imo its just a disaster waiting to happen. once the tank physically leaks on anything over 100 gallons imo it should be fully torn down and rebuilt as the primary seal has been compromised. that seal is 95% of the total strength of your tank as its the seal that physically holds the pannel joints together. add the fact that you believe the tank is 20-30 years old. most tank manufacturers recommend resealing every 10 years or so. id say its well ready to fail and should be redone anyways.
Fair enough. I am gonna give this a go and give a solid water test. There are only 2 seams that are 90 degrees on this tank. I am gonna pull the silicone in between the panels on the 135* seams and the 225*. Seams as I can get all the silicone between the panels out, clear and clean. Then I will run new silicone on the narrow side of thise seams as well a little extra wide. Then extra wide top and bottom. Should hold great. Or it will be a disaster. I found a local guy who resealed the other tank like this one from the same fish store. He successfully redid one. We will see how it holds.its your setup. but i would tear it down completely and rebuild. some people get away with just doing the secondary seal (inside bead) but on a tank that large imo its just a disaster waiting to happen. once the tank physically leaks on anything over 100 gallons imo it should be fully torn down and rebuilt as the primary seal has been compromised. that seal is 95% of the total strength of your tank as its the seal that physically holds the pannel joints together. add the fact that you believe the tank is 20-30 years old. most tank manufacturers recommend resealing every 10 years or so. id say its well ready to fail and should be redone anyways.
if it fails. I will be asking a lot of questions on how to successfully put this tank back together after it’s been broken apart and cleaned up.
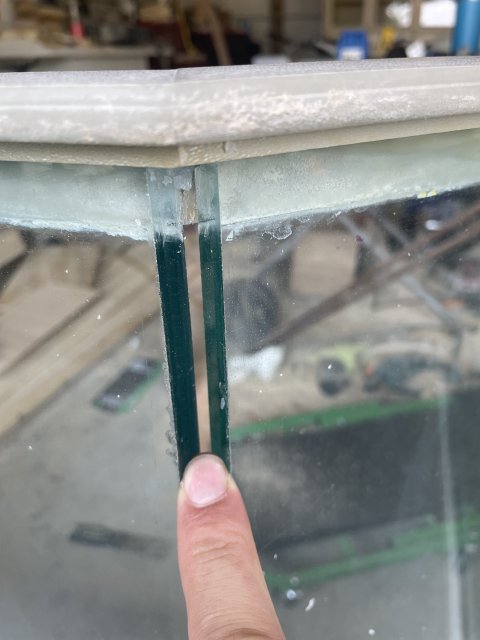
I'm curious; are the edges of the glass panes cut or ground at an angle, to produce perfect contact on the seams? Or is it just square cut glass with silicone filling in the angled gaps between?
It it's square cut, then I'm a bit surprised as it seems as though this would result in much weaker seams with a lot of silicone...but the picture a couple posts up seems to show this. If the edges are cut at an angle to make perfect 90-degree-contact seams, then I suspect that re-assembling would be an order of magnitude more difficult than merely building a box of 90-degree angles.
I shudder to think what a tank like this would have to cost if purchased new.
They are square cuts with silicone filling the gaps. Enough room to get all the silicone out and able to clean it with acetone. So the only Otho Al silicone will be the upper and lower trim pieces where the glass is recessed into, and the back 90 degree corner seams. You won’t be able to see that area in the tank so a wide seam to reinforce the old silicone hopefully and a nice seam along top and bottom and all new silicone in the 45degree angles through out included pictures of the initial seams in question. The leak that was present before was from one of these seams. Redoing them seems the most logical as access is available and fresh silicone will make these potentially weaker seams stronger and have fresh supporting silicone in and out.I'm curious; are the edges of the glass panes cut or ground at an angle, to produce perfect contact on the seams? Or is it just square cut glass with silicone filling in the angled gaps between?
It it's square cut, then I'm a bit surprised as it seems as though this would result in much weaker seams with a lot of silicone...but the picture a couple posts up seems to show this. If the edges are cut at an angle to make perfect 90-degree-contact seams, then I suspect that re-assembling would be an order of magnitude more difficult than merely building a box of 90-degree angles.
I shudder to think what a tank like this would have to cost if purchased new.

So I pulled the silicone between the greater than 90degree seams. Sealed them up from the wide open side first then immediately ran a bead on the thin side of the glass interface.
Ran the bottom int one go then did the verticals with back filling the large gaps in the glass joints, and then ran a solid bead between the top trim and the glass. Did it all in one sitting and besides this being my second reseal and being terribly ugly, it is good to go. It holds water and doesn’t leak. Planning on setting for a week. Then I will drain, set the tank on saw horses and pond line the wood bottom as the leak it had over the years took the laminated plastic covering off the plywood. Then repaint the stand and move it in. If you want more pictures or any details on what I did feel free to ask.
Ran the bottom int one go then did the verticals with back filling the large gaps in the glass joints, and then ran a solid bead between the top trim and the glass. Did it all in one sitting and besides this being my second reseal and being terribly ugly, it is good to go. It holds water and doesn’t leak. Planning on setting for a week. Then I will drain, set the tank on saw horses and pond line the wood bottom as the leak it had over the years took the laminated plastic covering off the plywood. Then repaint the stand and move it in. If you want more pictures or any details on what I did feel free to ask.

Awesome!So I pulled the silicone between the greater than 90degree seams. Sealed them up from the wide open side first then immediately ran a bead on the thin side of the glass interface.
Ran the bottom int one go then did the verticals with back filling the large gaps in the glass joints, and then ran a solid bead between the top trim and the glass. Did it all in one sitting and besides this being my second reseal and being terribly ugly, it is good to go. It holds water and doesn’t leak. Planning on setting for a week. Then I will drain, set the tank on saw horses and pond line the wood bottom as the leak it had over the years took the laminated plastic covering off the plywood. Then repaint the stand and move it in. If you want more pictures or any details on what I did feel free to ask. View attachment 1525115
Nicely done. Im guessing you let it cure for about a week? A week is usually more than adequate for a reseal but when replacing structural beads on thicker glass tanks i will usually let them cure at least 2 weeks. This is mostly a precautionary measure to guard against fluctuating temperatures, silicone approaching expiration, or any other factor that might compromise the silicones ability to cure as quickly as it should, particularly deep between the panels and corners of the tank.So I pulled the silicone between the greater than 90degree seams. Sealed them up from the wide open side first then immediately ran a bead on the thin side of the glass interface.
Ran the bottom int one go then did the verticals with back filling the large gaps in the glass joints, and then ran a solid bead between the top trim and the glass. Did it all in one sitting and besides this being my second reseal and being terribly ugly, it is good to go. It holds water and doesn’t leak. Planning on setting for a week. Then I will drain, set the tank on saw horses and pond line the wood bottom as the leak it had over the years took the laminated plastic covering off the plywood. Then repaint the stand and move it in. If you want more pictures or any details on what I did feel free to ask. View attachment 1525115
I only bring this up as a piggyback to
Anyway, what im getting at is that your seams have significantly more silicone volume than a tank built with beveled glass panels, so it might be advantageous to wait a bit more on the cure time. If youre holding steady for now and you dont see bubbles or voids forming in the seams you are most likely good to go.
I wouldnt worry about the messy appearance, whats important is that you didnt skimp on the silicone. Next time if you like simply use some masking tape. 15 minutes of work and $3 in tape will produce a much cleaner result.
I am still very suspicious about the lack of bracing on this tank. I would really like to see some glass eurobracing or hell, anything really, to reinforce those angular seams somehow. That is no small tank and an unforgiving volume of water to be horsing around with a rimless design...
Keep us posted on the progress.


