Fish Story Aquarium and Rescue, Naples, FL; two 4500 gal 13'x13'x4.5'

vincentwugwg

Gold Tier VIP
MFK Member
Oct 22, 2013
3,071
6,711
3,354
New York Mets
Thanks.

Yeah, piraiba's been stuck in the 240 gal acclimation tank because I don't believe it'd compete successfully in a 4500 gal. Ain't got anything in between in terms of gallonage.

vincentwugwg vincentwugwg What do you think Vince? Can it compete? I've described above how slowly and hesitatntly it feeds... in my hands anyway... I can't imagine it'd have a chance with the 4500 gal gang. But your two are in with lots of well-feeding tank mates. I know you had said they get a piece or two of fish per feeding. Has this been continuing? Improved? Worsened?
My piraibas are feeding better than ever. I never saw full bellies when they were in the smaller tank, now come feeding time.. they are waiting and fill up their tummies. I expect a growth sprout soon. My advice for your raiba is to fatten him up as much as possible in the next 2 wks and then introduce him to the 4500. Expect it to lose the beautiful streamers tho :( . He might have a hunger strike for a week or two but once it starts feeding, you will be happy! The 'other' two cats (B. Vallantti? B. sp.) finally started eating in the 3000 gallon tank.. took them almost a whole month but they are feeding like the raibas in the same tank.
 
Last edited:

wednesday13

Silver Tier VIP
MFK Member
Mar 2, 2008
4,521
4,411
1,629
The deep south
Hmmm. def unconventional... but i sure do like it. Although im flattered by ur kind words, i bow to u sir for all this fishy buisness u got goin on down there. simply amazing and inspiring! even tho im a bit jealous haha... lamanating is very plausible, keep in mind a gallon of #40 is around $135-150 tho and it sounds like ud need alot. Theres sometimes a price cut on cases of it. Iast time i ordered a case of 4gal it was around $450. Not terrible, just added cost to consider. Aside from needing a good amt of glue, i think ur plan to laminate at the joints,top and bottom will do exactly what u think it will to reinforce from any bowing. My biggest concern for ur plan is the front outside. For the posts or outside lamanating i think a 6"x6" lamanated acrylic post may be all u need cemented in. The top cap and inside lamanating should be very sound.

Physically lamanating acrylic with #40 should be just like using wood/glue. you wont need to clamp as tightly but same idea. Would b very cool if u can pull off clear posts, i think its doable with all that acrylic u have laying around in the vid haha.. :) . it also routers fairly easily to a clean/clear polish on edges. takes a bit of time but u could rid of any sharp edges with the router and sand polish all the cuts/glue back to clear.
#40 is like syrup, so still runny. U may make a mess glueing pieces all over but it can all be sanded/polished/buffed back off. That will be the hardest part. Anyone can glue...its the finishing that takes time/patience. Fine line between what u can glue and leave alone clean...or get out the sander and go through all the grits back to clear.
 
  • Like
Reactions: thebiggerthebetter

thebiggerthebetter

Senior Curator
Staff member
MFK Member
Dec 31, 2009
16,296
14,499
3,910
Naples, FL, USA
Very much appreciate the advice and opinion. I think my production will be (borderline) ugly but my hope is it will be functional.

[1] The Weld-on 40 resin shrinks 15%-20% during curing and in a large area application this means it will get sucked in from all edges. IDK how to fill all these voids yet on all 4 sides during curing. I mean if it was one side, I could keep topping it off as it is sucked in. But on four... Do you?

Vertical application I am told by German engineers that make Acrifix (same as Weld-on) is exceptionally tricky though, so I should stick to working with sheets laying flat.

[2] Another thing is the curing is inhibited by air (oxygen) that deactivates the catalyst. Again, Acrifix guys advise to use a tape with a non-adhesive center to tape up all the joints to improve the bond along the edges. It does not sound necessary but just an extra step. I wonder if you have done it and if I should bother.

[3] Finally, the Acrifix guys say not to use thicker than 0.1" layer of the resin. Curing produces heat. With thicker resin, it may get hot enough to boil and blister. Whacha think?
 

wednesday13

Silver Tier VIP
MFK Member
Mar 2, 2008
4,521
4,411
1,629
The deep south
Yup...too butt join those sheets id tape up 3 sides 1st... put the #40 pot/mix in a squeeze bottle and inject it in the 1/4" gap between the sheets. start at the bottom and lay tape behind/over ur glue as u go upward to hold it in. Ive used masking tape/packing tape to get the syrupy #40 to stay where i want it when i cant work flat or on a tank im repairing thats too large to tip/move by myself. Ive seen people use an empty chaulk tube filled with #40 to inject aswell. i use any bottle with a tip thats cheap and or disposable. ull go through a few. Its also possible to make jigs/forms with polypropolene and polyethylene as the #40 does not adhere to it. I once repaired a broken tank corner using poly p pieces to make a corner form...filled the golf ball sized void with #40 and was honestly amazed how well it worked. it buffed out perfectly clear and shrank very little. maybe 1/16". #40 sticks to itself so u can refill in any descrepencies.u can shape/mold/machine/ finish to ur needs.

Curing heat can be a concern.. ive poured batches of #40 as large as 1 pint and they can cure as quick as 10 minutes and get very hot. Smaller batches 100-200mil cure longer around 30-40min and stay fairly cool. Humidity plays a role in cure time ime also. My buddy in dry Utah sees quicker cures times than i do here in humid Ohio with the same mils of #40. I get diff cures through out the seaons here also.
As for heating enough to blister/boil...seen that too lol... burned my hands one time when i had a pot of 900 mil. mixed up in a capped squeeze bottle. the cure/heat happened so quick it left bubbles in the 2" thick area i was pouring. On this instance i was filling an acrylic dam to repair a seam/corner . 2"x1"x30".

on that note.... i disagree a bit with the germans saying to keep it under .1 resin. this wont matter much for what ur doing. but ive poured fillets up to 3" wide and 1/2" thick 8' long and had clean/clear/bubbless pours in the 100-400mil batch mix range. also made damns/molds many times, casting it if u will with good sucess in thicknesses up to 1". IME the heat problem has more to do with the batch size u mix rather than the thickness its laid out onto material. Id estimate u could fill ur joints/gaps with 200-400mil of #40 and do no harm on that 3/4" material.
3/4" and 1" take #40 very well.... 1/2" gets a bit hotter during the cures and can cause crazing so if ur using that 1/2" u talk about try and mix small batches of glue to counteract the heat. gotta have something to do with the amt of hardener used in larger batches that brings the extreme heat.

The "new" weld on #40 is a bit better across the board also, used it on a few friends tanks... stuff with the purple label... its clearer, doesnt get as hot and the fumes arent as bad either. im sure thats what ull come across anyway but just a heads up. i still have a supply of the old red label. just as good...but not as clear is the big thing. hope some of my rant helps lol...
 
  • Like
Reactions: thebiggerthebetter

thebiggerthebetter

Senior Curator
Staff member
MFK Member
Dec 31, 2009
16,296
14,499
3,910
Naples, FL, USA

wednesday13

Silver Tier VIP
MFK Member
Mar 2, 2008
4,521
4,411
1,629
The deep south
Helps tremendously. Will have more questions later. Great many thanks.
Any time man...always glad to share my sucess/failures. Let me know when ur getting into mixing batches of #40 and what not.
 

thebiggerthebetter

Senior Curator
Staff member
MFK Member
Dec 31, 2009
16,296
14,499
3,910
Naples, FL, USA
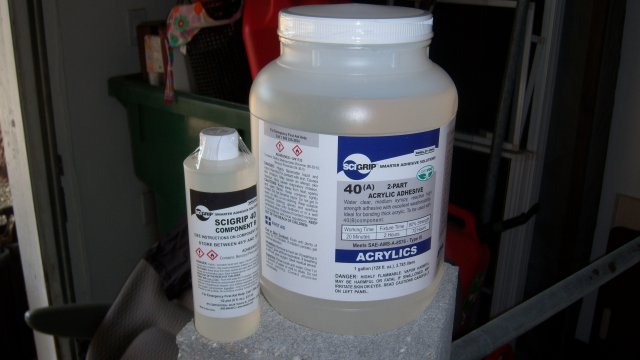
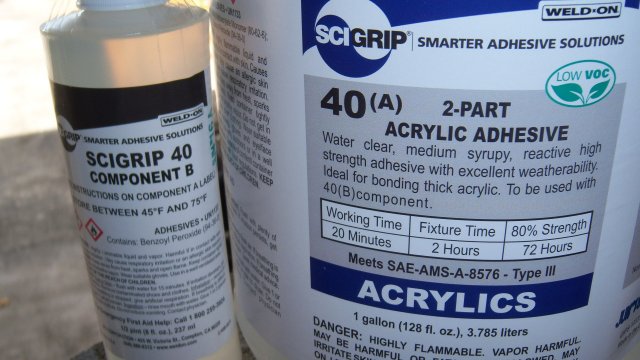
Hey Russ wednesday13 wednesday13 , finally I have the time to continue with my 20K pond and start gluing the acrylic windows and posts. Got my 4 gallons for $500 from IPS of Weld on 40. Neither red , nor purple but blue. :)

Reread your entire generous thread again http://www.monsterfishkeepers.com/forums/threads/weld-on-40-and-42.544585/page-14

Will start with gluing the posts together - 2'x7'x1/2" sheets face to face, with only 2'x3.5" above ground, so the bottom 3.5' are not important (will be embedded in concrete anyway).

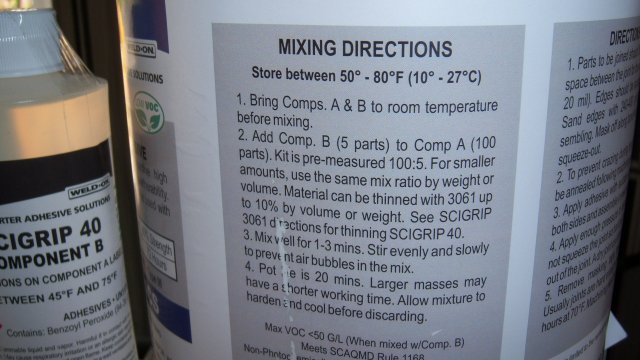
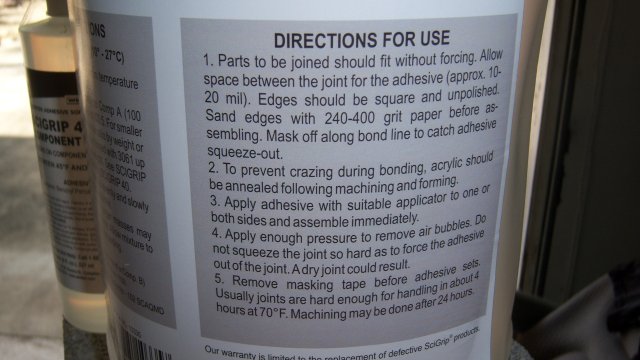
1. Should I sand the sheets for a better bite? If so, what grit? I naively think for such large area, I don't need to. Just clean them and finally wipe with alcohol or acetone?

2. You said it applies like a generic glue. Would you brush the 2-part mix onto the whole area on one sheet and then lay the other over and gently squeeze / tighten until set?

3. In your above-linked thread, you say no masking because the masking tape will get entrapped forever as Weld on "melts" into the substrates being glued but you also say you use masking tape. So to use or not to use? I thought the tape needs to be removed well before full cure.

4. I wonder how much Weld on will get sucked inside due to shrinkage during cure. I realize, like you said, I can top it off later on each side. So, on paper, it's no biggie, right?

100_7228.JPG 100_7229.JPG 100_7230.JPG 100_7231.JPG
 
  • Like
Reactions: moe214

wednesday13

Silver Tier VIP
MFK Member
Mar 2, 2008
4,521
4,411
1,629
The deep south
Hey Russ wednesday13 wednesday13 , finally I have the time to continue with my 20K pond and start gluing the acrylic windows and posts. Got my 4 gallons for $500 from IPS of Weld on 40. Neither red , nor purple but blue. :)

Reread your entire generous thread again http://www.monsterfishkeepers.com/forums/threads/weld-on-40-and-42.544585/page-14

Will start with gluing the posts together - 2'x7'x1/2" sheets face to face, with only 2'x3.5" above ground, so the bottom 3.5' are not important (will be embedded in concrete anyway).

1. Should I sand the sheets for a better bite? If so, what grit? I naively think for such large area, I don't need to. Just clean them and finally wipe with alcohol or acetone?

2. You said it applies like a generic glue. Would you brush the 2-part mix onto the whole area on one sheet and then lay the other over and gently squeeze / tighten until set?

3. In your above-linked thread, you say no masking because the masking tape will get entrapped forever as Weld on "melts" into the substrates being glued but you also say you use masking tape. So to use or not to use? I thought the tape needs to be removed well before full cure.

4. I wonder how much Weld on will get sucked inside due to shrinkage during cure. I realize, like you said, I can top it off later on each side. So, on paper, it's no biggie, right?

View attachment 1210764 View attachment 1210765 View attachment 1210766 View attachment 1210767
You may be a bit hard pressed to be gluing/laminating 2'x7' sections, I think you can cut them down to 7'x12" maybe. You'll burn through that 4 gal. pretty quick. With all the gluing you need to do on the inside for joining the sheets together I'd prob look past the acrylic posts for the outside and use steel with ur concrete to hold the windows back. Just a thought lol...If you don't mind buying 15+gal of #40, then not a problem.

1. Can never hurt to sand the sheets down for better adhesion , almost any grit will work. I usually use something between 80-200. Whatever sanded area you have will become clear when covered with #40. Ive glued a lot without sanding in my earlier trials/tribulations with #40...These days I usually always sand whatever im working on just to be safe. Sanding/polishing/finishing seems to go hand in hand with any acrylic gluing anyway unless your very good with a router and being clean from the start. (not easy when working with syrup consistency glue)

2. def. start smaller than the 7'x2' sections u propose to test the waters. Brushing the #40 wont do much but make a mess and bubbles... Its more of a pour right out of ur mixing cup guessing how much ull need to fill the sheets ur laminating and go from there. Clamp/squeeze together from one side to the other forcing the air out. I'm thinking you may be able to just glue the perimeters of ur sheets ur sandwiching together if they really need to be 7'x2' sections. Wont be all that pretty ...will save u a lot in glue tho. Another idea could be to stack/clamp all the sheets ur gluing together and "cap" the ends with full glue and a piece of material. That way everything would stay clean and save u a lot of glue also.

3. Tape.... You cant really mask off an area unless you remove the tape within the pot life of ur batch.
You can however use tape to create a dam or area to puddle up the glue. the sticky side of the glue will enable you to remove it when the glue is cured or set up. It doesn't come out perfectly clean...but can be sand/buffed out afterwards. You can build it up and sand it down clean very similar to bondo. Its just a lot harder.

4. When butt joining sheets together youll see a small amt. of shrinkage if you leave the top gap open. If you encapsulate the seam/joint with tape as you inject glue it should prevent almost all shrinkage. When laminating I don't suspect anything will pull in/shrink but ive only done smaller pieces 1-2sq. ft.

Hope I answered all ur questions...shoot back with anything further or that I may have left out.
 

thebiggerthebetter

Senior Curator
Staff member
MFK Member
Dec 31, 2009
16,296
14,499
3,910
Naples, FL, USA
Thank you my friend. What luck and privilege to be able to draw on your experience! Mess and bubbles, huh? No matter how I go about it, it'll be mess and bubbles, rest assured... :)

God willing, will have my first go at it today. Will show you my work. It'll be an eclectic mix of...

Plastic mess and lots of bubbles,
Plenty giggles, stress, and troubles...
 
zoomed.com
hikariusa.com
aqaimports.com
Store