Overflow box for plywood tank

Homer Siped

Candiru
MFK Member
Aug 30, 2015
201
65
46
41
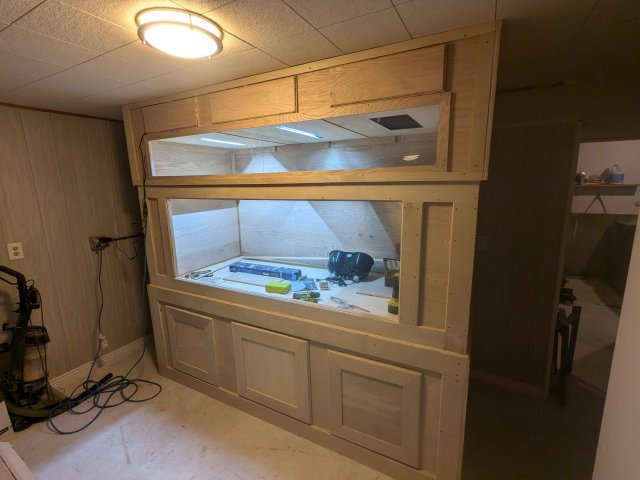
So this is a 500 gallon that im in process of building. Before adding glass i want to get the inside plumbing finished so when i add water, i can test the entire setup with the drains and everything. I want to do a long coast to coast on the back, probably use 3" pvc and mount it from the top with plastic hangers so im not drilling screws into the tank. Use a saw and cut my weirs in it on a slight angle about 1/4 inch apart and about 1.5 inches deep. I can use the height of that to control the water depth if the power goes out. Might take a little bit of trial and error to get it right. Instead of running the drains through the side of my tank i was thinking about mounting a 10 gallon aquarium on the side, make a shelf for it to sit on and run the c2c right out the side and 90 over to the 10 gallon tank. Basically making an external overflow box out of it and have my drains set up going down from there. Have that set to come in lower in the 10 gallon tank to keep noise down with bean animal style drains. Also i was looking at the jabao mwd 20000 return pump. Ran a dct 15000 for 5 years with no issues. What size return off of that? Im shooting for between 4k and 5k gph as i have a snapping turtle thats going in here and they're pretty messy. Kind of want the return to shoot across the bottom of the tank to keep everything cycling around instead of just moving a lot of surface water. Any thoughts or opinions?
1000028586.jpg
 

jjohnwm

Sausage Finger Spam Slayer
MFK Member
Mar 29, 2019
4,306
11,010
194
Manitoba, Canada
That's going to be a beautiful tank when it's finished! Congrats, nicely done! :)

As I'm sure you are aware, your turtle is going to be a destructive dynamo who can manage to wreck just about anything. I'd be very leery of a coast to coast overflow, or really anything else in the tank with him. Your idea of an external small tank for the overflow is one I use a lot and it works very well. I would just install a bulkhead in your tank, and attach a short piece of pipe with a 90-elbow to the outside of it to dump into the small tank. If you fit a threaded union between the bulkhead and the 90 (outside the tank), you can loosen the union and then rotate the 90 up or down, which allows very fine control over the water level in the tank; the water level will be set by the level of the opening on the 90.

As an aside, you can also install a bulkhead inside the tank near the bottom, and then run an external pipe up from the outside of the bulkhead to the small tank. This works the same way as the other idea, but draws water from the bottom instead of the top. If you do this, you must install some sort of rounded or three-dimensional grate over the water intake in the tank to keep the turtle from getting itself caught on the intake by suction. I once lost a large softshell turtle that way, not a mistake I will ever make again.
 
  • Like
Reactions: tlindsey

HUKIT

Dovii
MFK Member
Jan 7, 2010
198
275
102
50
Chicagoland
I’m following a lot of these builds and damn some of you are very talented. I see a lot of home build tanks don’t have this type of cabinetry work so this going to be gorgeous!
 

M1A1

Piranha
MFK Member
Jun 10, 2013
142
147
76
MN
10 gallon aquariums have the thinnest possible glass you can imagine so drilling one tank for multiple bulkheads may be difficult without it cracking. Or maybe I'm an absolute ape with the glass drill but the only tanks I've ever had crack are 10's.

If you're feeling adventurous and want to skip more epoxy/fiberglass work, take a look at PVC trim board or PVC foam board which is now available at Lowes, Home Depot, etc., under the Royal Building Products brand. Full size (4x8ft) sheets of 1/4, 3/8, or 1/2 inch thick for $80 to $100. Glue it together with normal PVC glue and silicone the inner seams just like a glass tank. The 1/4" stuff needs a plywood backer as it's a bit too wobbly for my liking but 3/8 and 1/2 may be okay in standard 10-gallon-tank dimensions. I'm looking at this stuff for a potential mini-monster tank build along with the PVC trim pieces in normal lumber dimensions (1x4, 2x2, etc.) in order to avoid any epoxy/fiberglass work.
 
  • Like
Reactions: jjohnwm

Homer Siped

Candiru
MFK Member
Aug 30, 2015
201
65
46
41
That's going to be a beautiful tank when it's finished! Congrats, nicely done! :)

As I'm sure you are aware, your turtle is going to be a destructive dynamo who can manage to wreck just about anything. I'd be very leery of a coast to coast overflow, or really anything else in the tank with him. Your idea of an external small tank for the overflow is one I use a lot and it works very well. I would just install a bulkhead in your tank, and attach a short piece of pipe with a 90-elbow to the outside of it to dump into the small tank. If you fit a threaded union between the bulkhead and the 90 (outside the tank), you can loosen the union and then rotate the 90 up or down, which allows very fine control over the water level in the tank; the water level will be set by the level of the opening on the 90.

As an aside, you can also install a bulkhead inside the tank near the bottom, and then run an external pipe up from the outside of the bulkhead to the small tank. This works the same way as the other idea, but draws water from the bottom instead of the top. If you do this, you must install some sort of rounded or three-dimensional grate over the water intake in the tank to keep the turtle from getting itself caught on the intake by suction. I once lost a large softshell turtle that way, not a mistake I will ever make again.
I didnt think of just dumping it into the small tank like that. Good idea. The only thing he really attacks is plants. When he was small i tried fake ones and he destroyed them and tried with live plants and also destroyed those too lol. Never bothered any other decorations. So most of the top of the aquarium part will be covered off for a basking area, i was planning on butting the c2c right up to the top of the aquarium part so he cant climb on it. I had an overflow box inside his last tank and had a cover on it that he decided to pull off and climbed inside the overflow and stuck his head up to the full siphon, its a wonder it didnt kill him as it was moving right around 2500gph through it. I was figuring just a c2c it shouldn't have any real suction to it for him to get in trouble with.
 
  • Like
Reactions: jjohnwm

Homer Siped

Candiru
MFK Member
Aug 30, 2015
201
65
46
41
I’m following a lot of these builds and damn some of you are very talented. I see a lot of home build tanks don’t have this type of cabinetry work so this going to be gorgeous!
Thanks, this has been a project since august lol my first wood project that i want to look really good so been taking my time and learning as i go. There are a few mess ups i have made along the way that arent really visible but they stick out to me because i know they are there
 

Homer Siped

Candiru
MFK Member
Aug 30, 2015
201
65
46
41
10 gallon aquariums have the thinnest possible glass you can imagine so drilling one tank for multiple bulkheads may be difficult without it cracking. Or maybe I'm an absolute ape with the glass drill but the only tanks I've ever had crack are 10's.

If you're feeling adventurous and want to skip more epoxy/fiberglass work, take a look at PVC trim board or PVC foam board which is now available at Lowes, Home Depot, etc., under the Royal Building Products brand. Full size (4x8ft) sheets of 1/4, 3/8, or 1/2 inch thick for $80 to $100. Glue it together with normal PVC glue and silicone the inner seams just like a glass tank. The 1/4" stuff needs a plywood backer as it's a bit too wobbly for my liking but 3/8 and 1/2 may be okay in standard 10-gallon-tank dimensions. I'm looking at this stuff for a potential mini-monster tank build along with the PVC trim pieces in normal lumber dimensions (1x4, 2x2, etc.) in order to avoid any epoxy/fiberglass work.
A guy on another group had mentioned formica board for sealing inside. He used a construction adhesive to glue it to the plywood and then a silicone to seal it like a regular aquarium. I did 2 layers of fiberglass and a moss green pond shield. Only using pondshield for the color, i tried fiberglass tint once and it didnt turn out well.
 
  • Like
Reactions: jjohnwm

Homer Siped

Candiru
MFK Member
Aug 30, 2015
201
65
46
41
That's going to be a beautiful tank when it's finished! Congrats, nicely done! :)

As I'm sure you are aware, your turtle is going to be a destructive dynamo who can manage to wreck just about anything. I'd be very leery of a coast to coast overflow, or really anything else in the tank with him. Your idea of an external small tank for the overflow is one I use a lot and it works very well. I would just install a bulkhead in your tank, and attach a short piece of pipe with a 90-elbow to the outside of it to dump into the small tank. If you fit a threaded union between the bulkhead and the 90 (outside the tank), you can loosen the union and then rotate the 90 up or down, which allows very fine control over the water level in the tank; the water level will be set by the level of the opening on the 90.

As an aside, you can also install a bulkhead inside the tank near the bottom, and then run an external pipe up from the outside of the bulkhead to the small tank. This works the same way as the other idea, but draws water from the bottom instead of the top. If you do this, you must install some sort of rounded or three-dimensional grate over the water intake in the tank to keep the turtle from getting itself caught on the intake by suction. I once lost a large softshell turtle that way, not a mistake I will ever make again.
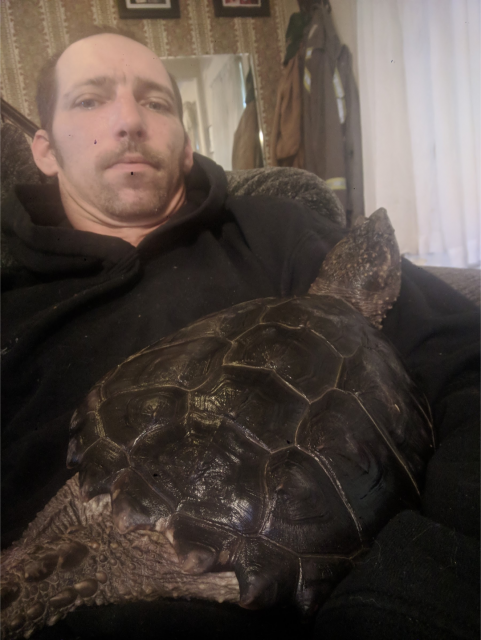
This is my turtle that thinks he is a dog lol. I moved him cross country with me after divorce and moving his old tank would not have been cost effective so that's why im building thos one. He currently lives in our bathtub until i get his tank finished. Long story short my ex highly neglected him for almost 2 years so he was starved and been dealing with shell rot since august when i was able to get him back but he is doig okay since i got him back

1000029900.png
 

jjohnwm

Sausage Finger Spam Slayer
MFK Member
Mar 29, 2019
4,306
11,010
194
Manitoba, Canada
Ah, so that's what you have going on with the lighting in that tank! That upper clear panel is to allow observation of the turtle while basking; the two strips on the left are just for illumination, and the large opening on the right will be some sort of basking fixture? Very nicely done.

I think this will make a terrific display. Snappers are one of those common-as-dirt species that many people overlook for that reason alone, but they are unique and interesting and impressive as hell, especially when as large as yours.

Good luck going forward with him, I hope you post some pics of the completed setup! :)
 

Homer Siped

Candiru
MFK Member
Aug 30, 2015
201
65
46
41
Yes sir that is exactly correct. The light all the way on left is a regular aquarium light, the middle is a uvb reptile light and the big on will have another uvb and heater or 2 heaters. Depending on how well it lights or heats. May end up with other heaters to maintain the temp up there. Kind of beating my head off the wall trying to figure out the lighting under the basking area, was thinking about pool lights but i did see some submersible lights yesterday for aquariums but cant think who makes them.

Snappers are way misunderstood animals and i think they get a bad wrap of being mean and nasty when they are solitary animals and just want to be left alone. I appreciate the good words. I had a softshell when i was a kid and they are really cool turts as well.
 
zoomed.com
hikariusa.com
aqaimports.com
Store